Desk Cable Management: The Complete Guide to a Cable-Free Setup
From €3 velcro ties to recessed channels — the complete method to eliminate cables from your field of view.
You invested in a beautiful desk, a good monitor, perhaps a mechanical keyboard. And behind it all, there is a cascade of tangled cables that visually undoes everything else. Cable management is not a perfectionist's obsession — it is the final step of any serious setup. And contrary to what people think, it does not cost much and it does not take an entire day. Here is the method.
Why cable management is not optional
Cable management is often discussed as an aesthetic luxury. That is not quite right. Three practical reasons justify spending time on it.
Electrical safety. Tangled cables pulling on connectors create micro-mechanical stresses. Over time: loosened sockets, cracking connectors, cables whose sheathing frays. A damaged power cable behind a cluttered desk is difficult to spot before it becomes a real problem.
Productivity. Studies in environmental psychology (Vohs et al., 2013) show that visual clutter increases cognitive load and cortisol levels. Your brain expends attentional resources processing background disorder, even when you are not conscious of it. A visually clean desk reduces that drain.
Maintenance. When you need to unplug a cable to swap a peripheral, a neatly routed setup takes 30 seconds. A tangled nest takes 5 minutes and makes you disconnect 3 things you did not intend to disconnect.
The inventory: start by counting your cables
Before buying anything, sit at your desk and count everything that is plugged in. Note each cable: where it comes from, where it goes, and whether it is removable (a cable you plug and unplug regularly) or fixed (a cable that never moves once installed).
Categorise:
Fixed cables (never move)
- Monitor power supply
- Monitor video cable (HDMI, DisplayPort)
- Standing desk power supply
- Soundbar or speaker power supply
- Desk lamp power supply
Semi-permanent cables (rarely move)
- USB-C or Thunderbolt to dock/hub
- Desktop computer power supply
- Ethernet cable
Removable cables (plugged/unplugged regularly)
- Laptop charger / USB-C laptop
- Wired headset
- Data transfer cables (external hard drives, etc.)
- Phone cable
This distinction matters: removable cables must not be bundled into the same systems as fixed cables. You need to be able to unplug them in one second.
Do not manage removable cables and fixed cables with the same system. A removable cable bundled into a sleeve with fixed cables becomes a problem every time you need to unplug it — you end up pulling on the entire harness. Treat them separately from the start.
The tools: what you actually need
The cable management market overflows with useless gadgets. Here is what actually works.
Velcro ties (reusable cable ties)
The most useful product per euro spent. A pack of 50 velcro ties costs €5 to €10. They are reusable, they do not cut into cables (unlike plastic zip ties), and they let you group cables into clean bundles. Recommended width: 12 to 20 mm for desk cables. 3M Command or generic Hook & Loop models work just as well as specialist brands.
Avoid zip ties (plastic cable ties): once tightened, they are nearly impossible to remove without scissors, making any modification laborious. And if you tighten them too hard on a power cable, you will compress the sheathing — bad for insulation.
Cable raceways / cable channels
A raceway is a tube or half-gutter that conceals cables running along a wall or desk. Two types:
Adhesive raceway (D-Line, Legrand): sticks to the wall or desk edge. Easy to install, hides 3 to 5 cables. Be careful on freshly painted walls or delicate surfaces — the adhesive can strip paint when removed.
Desk-clamp raceway: mounts under the desktop, cables completely hidden beneath the work surface. Ideal for cables running between the dock/hub and the back of the desk.
Under-desk cable tray / raceway
A perforated metal or plastic tray that screws under the desktop. You store the power strip, laptop charger, USB adapters in it — everything disappears below the surface. A 200 × 50 cm tray costs €20 to €30. This is the most transformative upgrade for setups with many peripherals: the power strip leaves your line of sight, and all cables are organised inside the tray.
Desk grommet (cable pass-through)
A hole drilled through the desktop with a rubber or metal insert that lets you route cables through the surface — from the top of the desk down to the power strip hidden in the tray below. If your desk does not have one, adhesive models or clip-on grommets exist that require no drilling. Standard diameter: 60 mm. Cost: €5 to €20.
Adhesive cable clips
Small clips that attach to the desk or wall to guide an individual cable along a precise path. Useful for removable cables (laptop charger, headset) — you guide the cable to the desk edge, it stays there when you set it down, and you retrieve it easily. Cost: 10 clips for €3 to €5.
The method: the order that avoids redoing everything
Most people tackle cable management in the wrong order. They group the cables, then realise the power strip is in the wrong spot, undo everything and start over. Here is the right order.
Step 1: Position the power strip
The power strip is the epicentre of your cabling. All your power supplies converge toward it. So its placement determines the length of every power cable. Ideally: under the desk, secured beneath the desktop with a cable tray or two heavy-duty double-sided velcro strips, or slid into an under-desk basket.
Do not leave it on the floor. A cable dropping from the desk to a power strip on the floor is the number one vector of disorder.
Step 2: Identify the cable exit point
Where do cables leave the desk toward the computer, the dock, the monitor? That is where you will concentrate your main raceway or your grouped cable bundle. On most setups: bottom left or right of the desk, depending on where the computer sits.
Step 3: Install the under-desk tray (if using one)
Screw or adhere the under-desk tray. Place the power strip inside it. Route all power cables through the tray.
Step 4: Group fixed cables by destination
With velcro ties, bundle cables heading in the same direction. Cables going to the monitor together. Cables going to the computer/dock together. Do not mix power cables and data cables if you want to avoid electromagnetic interference (especially relevant for audio cables).
Step 5: Route the grouped cables
Secure the bundle under the desktop or along the desk with adhesive clips or a raceway. The bundle should never hang freely in the air — it must be guided from one point to the next.
Step 6: Manage removable cables separately
For cables you plug and unplug regularly (laptop charger, headset), guide them with 2 to 3 adhesive clips on the desk edge. Leave 10 to 15 cm of slack at the cable end for comfortable plugging. The goal is not to hide them — it is to keep them within reach without them trailing.
Step 7: Manage excess cable length
The HDMI cable shipped with your monitor is often 2 metres long when you only need 50 cm. Do not cut cables. Coil the surplus into a loop 10 to 15 cm in diameter and secure with a velcro tie. Hide the coil behind the desk or in the under-desk tray.
Conversely, do not force cables that are too short. A USB-C cable stretched to its maximum creates strain on the connector — this is the primary cause of damaged USB-C connectors. If a cable is barely long enough, replace it with one 20 cm longer. The cable costs €5. Repairing a USB-C port soldered to the motherboard costs €200.
Specific setups
Standing desk
Cable management for a standing desk has an additional constraint: cables must absorb vertical movement. On a desk that rises from 70 cm to 120 cm, your cables need 50 cm of extra slack. The solution: a 30 cm cable loop beneath the desktop, held by a loose velcro tie, that unspools when the desk rises. Some standing desks (Flexispot, Ergonofis) include a built-in cable management system with a hollow column.
Multi-monitor setup
Two monitors mean two video cables, two power supplies, plus a USB cable to the dock if you use a hub. Group by monitor (all cables from the left monitor together, all from the right together), then bring both bundles to a central point under the desk.
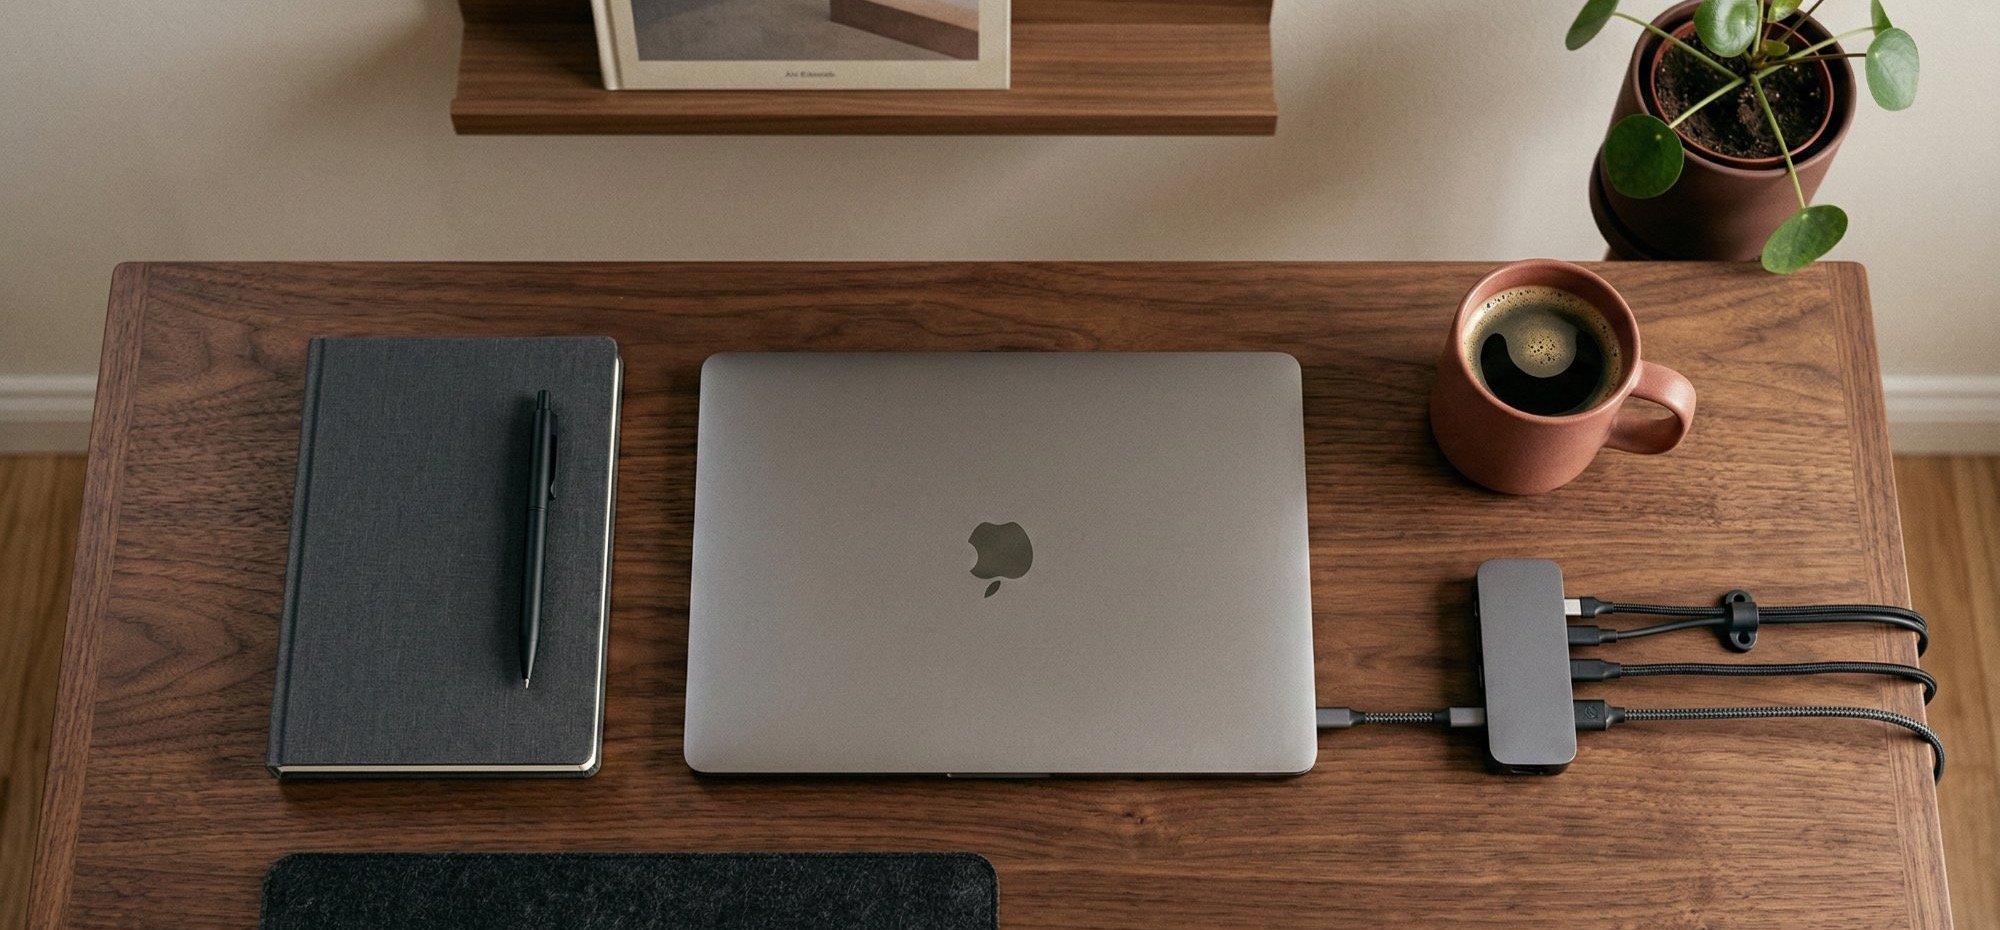
MacBook in closed-lid mode (clamshell)
The MacBook in clamshell mode is the setup that generates the most cables: USB-C power (often 2 for Pro models), Thunderbolt cable to dock, sometimes a direct video cable if you are not using a dock. The dock is your ally: a good Thunderbolt 4 dock (CalDigit TS4, OWC Thunderbolt Go Dock) reduces the number of cables to the Mac to a single Thunderbolt cable. All other cables (HDMI, USB, Ethernet) converge at the dock.
What it brings (beyond aesthetics)
A neatly cabled desk changes your relationship with your workspace. It is not a question of vanity. It is a question of signal: an orderly desk tells your brain that this space is under control, that it is dedicated to serious work. Vohs's research (2013) on physical order and associated behaviours quantified it: people in orderly environments make healthier choices, show greater generosity, and demonstrate better perseverance on difficult tasks.
Cable management is not the glamorous part of the setup. But it is the part that makes everything else — the desk, the monitor, the keyboard — feel like a considered investment rather than an accumulation of hardware.
Budget summary
Minimal setup (€20–40): Velcro ties × 50, adhesive clips × 20, 1 m adhesive raceway. Result: cables grouped and guided, power strip less visible.
Intermediate setup (€50–80): Add an under-desk cable tray to hide the power strip and adapters. Result: desk surface entirely clear.
Complete setup (€80–150): Under-desk tray + desk grommet + monitor arm with integrated cable management. Result: zero visible cables from the working position.
In every case, start with the inventory and position the power strip before buying anything. Most cable management problems stem from cables that are too short or a poorly positioned power strip — two problems that hardware alone does not solve.
Le Tapis de Bureau Alto — a felt and cork surface that visually frames your work zone. When the cables disappear, what remains on the desk matters all the more.
L'Étagère de Bureau Alto — a solid wood riser whose under-shelf space accommodates dock, charger, and excess cables. Invisible storage begins with furniture that makes it possible.
Vohs K. et al., "Physical Order Produces Healthy Choices, Generosity, and Conventionality", Psychological Science, vol. 24(9), 2013
McMains S. and Kastner S., "Interactions of Top-Down and Bottom-Up Mechanisms in Human Visual Cortex", Journal of Neuroscience, 2011
IEC 60227, PVC-insulated cables — mechanical requirements and bending stress
D-Line, cable management solutions product guides, dline.com